Manage workgroup parcels
Add, edit, change the status of, or remove workgroup parcels.
Prerequisites
Administer Workgroups permission is required to manage workgroups and workgroup settings.
Add associated parcels
You can associate any active parcels with a workgroup.
-
Go to the appropriate workgroup.
-
On the Associated Parcels panel, select Add.
-
Search for a parcel.
-
Select the checkbox for a parcel.
-
If necessary, search for and select additional parcels.
- For With Workgroup Parcel Status, select the status for the parcels.
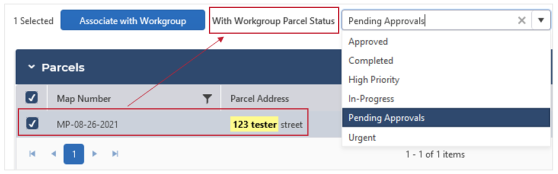 Note: This field only includes statuses tied to the Workgroup Type (from Settings) assigned to the Workgroup.
- After selecting all parcels and applying the parcel status, select Associate with Workgroup.
The parcels display in the Associated Parcels panel.
Change workgroup status of parcels
Each parcel has a status that you can adjust. However, parcels also have a status in the workgroup. If a parcel is associated with multiple workgroups, you can use the "workgroup status" to keep track of what needs to be done in each workgroup.
You can change the workgroup status of one or more parcels at a time.
Single parcel
-
In the Associated Parcels panel, select Edit for the appropriate parcel.
-
For Workgroup Parcel Status, select a status from the drop-down list.
Note: This field only includes statuses tied to the Workgroup Type (from Settings) assigned to the Workgroup. -
Select Save.
The parcel's status in the workgroup is updated.
Multiple parcels
-
In the Associated Parcels panel, select the checkboxes for the appropriate parcels.
-
At the top of the panel, select Status Change.

-
For Workgroup Parcel Status, select a status from the drop-down list.
Note: This field only includes statuses tied to the Workgroup Type (from Settings) assigned to the Workgroup. -
Select Status Change.
The status is applied to the selected parcels and displays in the Status in Workgroup column of the grid.
Create a task for workgroup parcels
You can create a task for one or more parcels at a time.
-
In the Associated Parcels panel, select the checkboxes for the appropriate parcels.
-
At the top of the panel, select Generate Task.
- Populate the fields. Learn more: Create and assign tasks
- Select Create Task.
The task is created and the task record opens. The task can be accessed from the workgroup and parcel records.
Print mailing labels
You can create a task for one or more parcels at a time.
-
In the Associated Parcels panel, select the checkboxes for the appropriate parcels.
-
At the top of the panel, select Print Mailing Labels.
- Populate the fields.
-
Label Format: Select the label format, either Avery 5961 (default) or Avery 5160.
-
Start Column and Start Row: Enter or select the column and row to start printing the labels. Defaults to 1.
-
Print Identifier(s): Select to print the primary parcel identifier (i.e., Map Number) on the first line of the mailing labels. If not selected, the Name prints on the first line.
-
Sort By (optional): Select one or more fields to sort by. The default order is by Map Number.
- Select View Labels.
The document opens as a PDF in a new browser window.
You can now print the report or save it to your computer using your browser options.
Export mailing labels
Export the mailing labels as an .xlsx file.
-
In the Associated Parcels panel, select the checkboxes for the appropriate parcels.
-
At the top of the panel, select Print Mailing Labels.
- Populate the fields.
-
Select Export Labels.
The document downloads to your computer as an .xlsx file.
Remove parcels
You can remove one or more parcels at a time.
Remove a single parcel
-
In the Associated Parcels panel, locate the appropriate parcel.
-
Select the Remove icon.
-
On the confirmation message, select Yes.
The parcel is removed from the workgroup.
Remove multiple parcels
-
In the Associated Parcels panel, select the checkboxes for the appropriate parcels.
-
At the top of the panel, select Remove.
-
On the confirmation message, select Yes.
The parcels are removed from the workgroup.